Chapter 26: Building Your Own REST API
1. Building your own REST API
You build an API when one system has data or logic, and another system needs controlled access to it over the network. In modern software development, this architecture is everywhere. A frontend (like a React web application or a mobile app) frequently needs to fetch data from a backend application, which securely manages a database and exposes its resources through API endpoints. Building your own REST API means designing this bridge, giving you the power to dictate exactly how your applications communicate, scale, and secure their data.
What it means to create your own API
Creating your own API does not only mean writing a few URLs that return JSON. It means deciding how another program is allowed to interact with your application. You are designing a contract. That contract says which resources exist, what actions are possible, what data must be supplied, what shape the response will have, and what happens when something goes wrong.
Building an API is about drawing a secure boundary between two systems. The core principle is straightforward: System A has data or logic, and System B needs controlled, predictable access to it over a network.
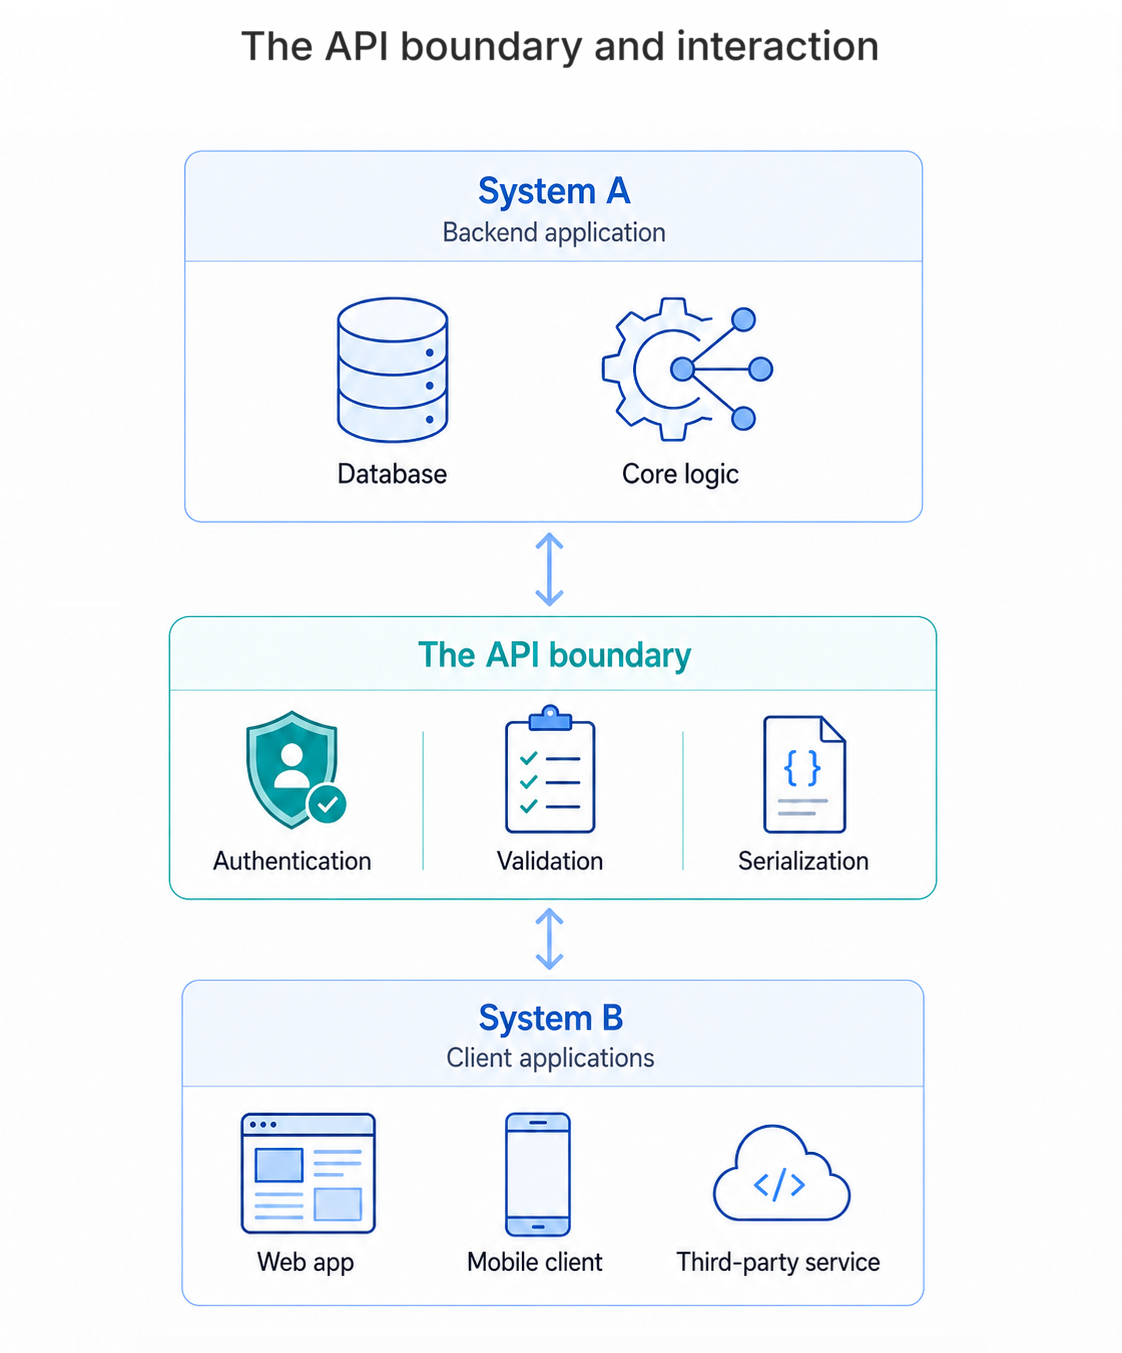
The API boundary is the point of control. It defines what data or functionality System A shares, how System B can request it, and what rules govern that exchange. This boundary is crucial for security, scalability, and maintainability. It allows you to enforce authentication and authorization, validate incoming data, and serialize outgoing responses in a consistent format.
A good API feels predictable to the person using it. If a developer understands one endpoint, the next endpoint should feel familiar. Naming, request formats, response formats, status codes, and error messages should all follow the same pattern. That consistency is what turns a collection of routes into an interface that other people can confidently build on.
The request lifecycle
Every API request passes through a sequence of decisions. A client sends an HTTP request. The API checks whether the caller is allowed to make that request. It validates the input, runs the application logic, talks to a database or external service if needed, and then returns a response in a format the client can understand.
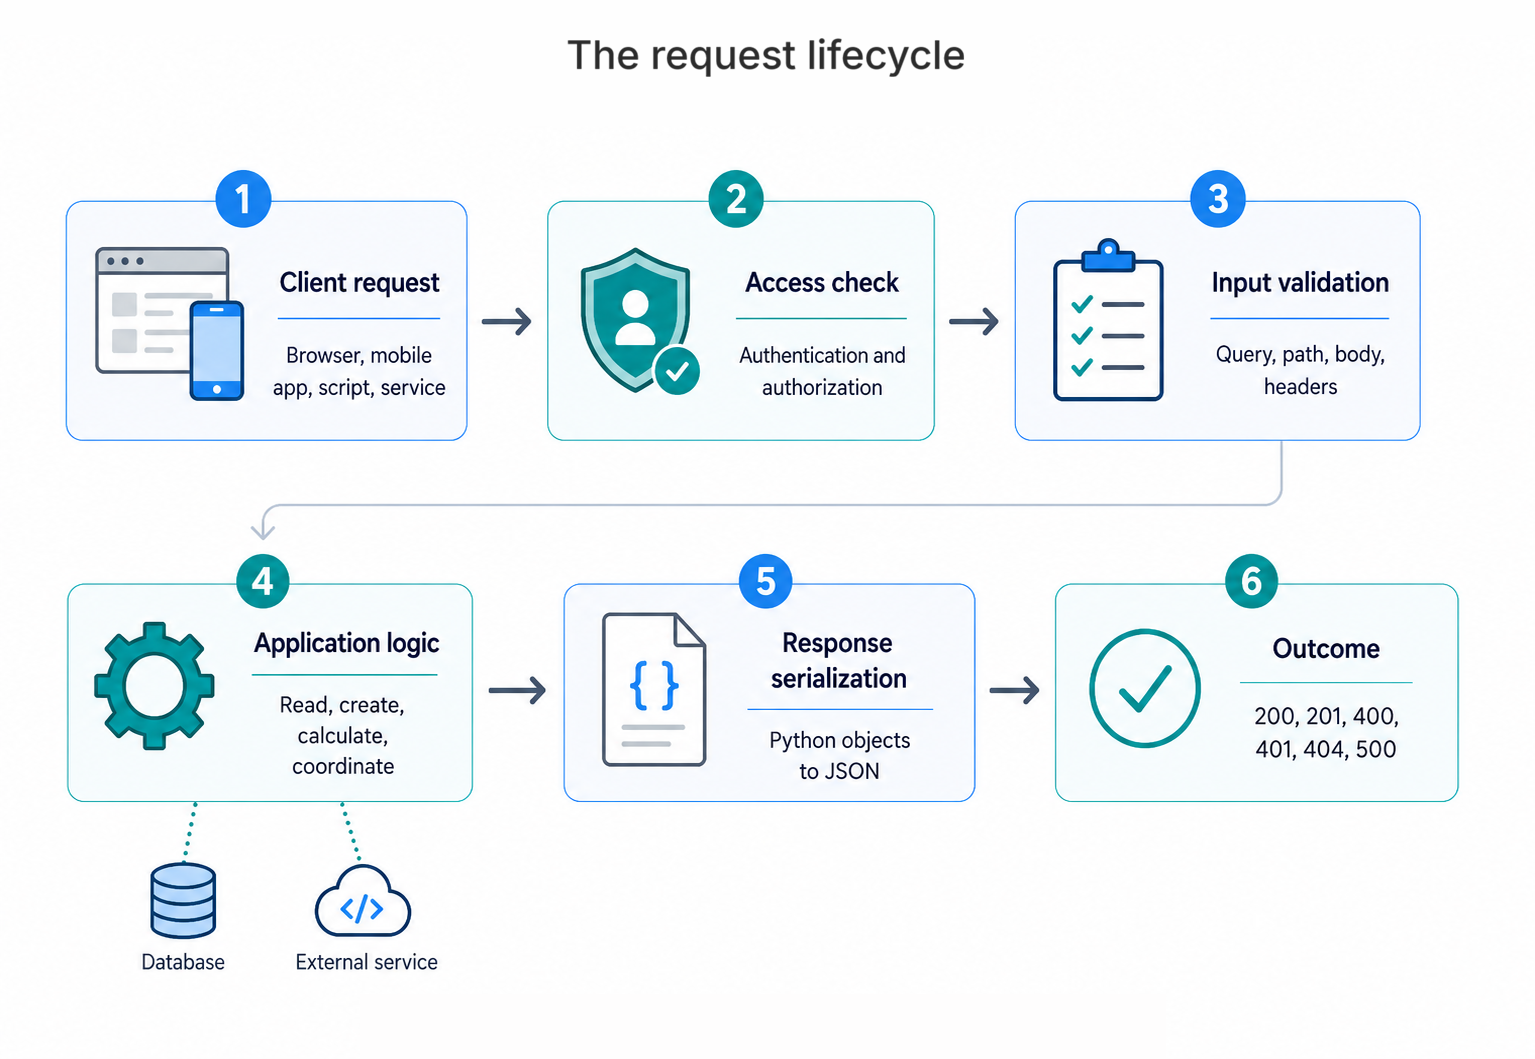
- Client request: This might be a browser, a mobile app, another backend service, a scheduled script, or a third-party customer.
- API checks access: Authentication answers the question "Who is calling?" Authorization answers "What is this caller allowed to do?"
- API validates input: Query parameters, path parameters, request bodies, and headers must be checked before they reach your business logic.
- Application performs the work: The API may read from a database, create a record, call another API, calculate a result, or coordinate several of these steps.
- API serializes the response: Internal Python objects are converted into JSON so the client receives a clear, stable response.
-
API communicates the outcome: Status codes such as
200,201,400,401,404, and500tell the client what happened.
The API you will build
In this chapter, you will build an API by turning the Chapter 11 news aggregator into a FastAPI service that clients can call through a small, authenticated HTTP interface.

The News Aggregator is a Python script that fetches articles from two different news providers, merges their different response shapes into one consistent format, and prints the combined feed to the terminal.
Once your API is built, another program will be able to request recent technology articles from your API. It will send an API key in the request header, choose optional filters in the URL, and receive one consistent JSON response even though the articles may come from different news providers.
Request from client
GET /articles?category=technology&limit=2
Authorization: Bearer YOUR_API_KEY
Response from your API
{
  "articles": [
    {
      "id": 17,
      "title": "AI Breakthrough in Medical Imaging",
      "description": "Researchers publish new results...",
      "url": "https://example.com/article",
      "source": "newsapi",
      "category": "technology",
      "published_at": "2026-05-25T09:30:00+00:00"
    }
  ],
  "count": 1,
  "cache_status": "miss"
}
This exchange captures the core design of the API. /articles
names the resource, GET asks to read it, the query parameters
filter the results, the Authorization header identifies the
caller, and the JSON response gives every client the same article shape.
The cache_status field also shows whether the API used stored
results or fetched fresh data from an external provider.
Next we look at how to build an API like this, starting with the framework you will use and a preview of what the code looks like before you write any of it.
Options for building your own REST API
There are several ways to build a REST API in Python. The right choice depends on how much structure you want, how quickly you want to move, and how production-ready the project needs to be.
- Build directly with Python's standard library: You can create basic HTTP servers without installing a framework, but you have to handle routing, validation, errors, and response formatting yourself. This is useful for learning, but rarely the best choice for a real API.
- Use a lightweight framework such as Flask: Flask gives you routing and request handling without imposing much structure. It is flexible and beginner-friendly, but larger APIs often need extra libraries for validation, documentation, authentication, and database integration.
- Use a full-stack framework such as Django with Django REST Framework: This is a strong choice when your API belongs to a larger web application with users, admin screens, permissions, and database models. It gives you a lot, but it also brings more framework structure.
- Use FastAPI: FastAPI is designed specifically for building REST APIs in modern Python. It is the framework you will use in this chapter.
- Use a serverless function platform: You can expose API endpoints through services such as AWS Lambda, Azure Functions, or Google Cloud Functions. This can work well for small isolated endpoints, but the deployment model adds cloud-specific complexity.
The three main framework options are worth comparing directly before committing to one:
| Feature | Flask | Django + DRF | FastAPI |
|---|---|---|---|
| Primary focus | Lightweight, flexible microframework | Full-stack web applications | High-performance, modern async APIs |
| Data validation | Manual or via extensions | Built-in serializers | Automatic (Pydantic) |
| Interactive docs | Manual or via extensions | Manual or via extensions | Automatic (Swagger / ReDoc) |
| Async support | Limited | Limited | Native / Core |
| Best suited for | Small APIs, prototypes | Large apps with admin, users, ORM | Clean REST APIs built step by step |
Of those three, FastAPI is the one you will use in this chapter.
How FastAPI works
Here is what each feature does and why it matters for API development:
- Routing: Routes connect HTTP methods and URLs to your Python functions.
- Request validation: Type hints and data models tell FastAPI what inputs to expect.
- Response serialization: Serialization turns your Python return values into JSON responses.
- Dependency injection: Dependencies let you reuse shared setup such as database sessions, authentication checks, and configuration.
- Interactive documentation: FastAPI generates browser-based API docs from your routes, type hints, and data models.
That is what you will use to build the news aggregator API. Next, a quick look at what FastAPI code actually looks like before you write any of it.
Preview of the code
FastAPI works by turning ordinary Python functions into HTTP endpoints. Here is the smallest possible example:
from fastapi import FastAPI

app = FastAPI()

@app.get("/articles")
def get_articles():
    return {"message": "Here are the articles"}
app = FastAPI() creates the application object. @app.get("/articles") registers a route: it tells FastAPI that a GET request to /articles should call the function below. The function returns a plain Python dictionary, and FastAPI serializes it to JSON automatically.
Run that with uvicorn main:app --reload and you get two things immediately: a working /articles endpoint, and an interactive documentation page at /docs generated from your code.
Next, in section 2, you will see the plan for this chapter and the order in which each layer of the API gets built.