4. Docker fundamentals
Docker is the most common container runtime. This page covers the day-one mechanics: write a Dockerfile, build an image, run a container, and inspect what's happening inside.
Docker is the container runtime and tooling we'll use to build, package, and run the news aggregator. The previous page covered what a container is in the abstract; this one covers the three concrete things you actually touch: a file you write, an artefact it builds into, and a process that runs from that artefact.
- The Dockerfile. A plain text file with instructions for building the image: start from this base, copy these files in, run this command. It's a recipe, checked into source control.
- The image. The artefact built from the Dockerfile. Immutable, content-addressable, layered. Roughly the OOP equivalent of a class definition: a frozen template that other things instantiate.
- The container. A running instance of an image. One image can spawn many containers, each with its own writable layer and process tree. The class-and-instance analogy carries: image is the class, container is the object.
The Docker architecture
Docker uses a client-server architecture to manage these components:
- Client: The command line tool (
docker build,docker run) you use on your terminal. - Daemon (Server): A background process running on your computer that does the heavy lifting (building, running, and distributing containers).
- Registry: A cloud storage for images (like Docker Hub). This is where you download official images (like
postgresorpython) instead of writing them from scratch.
Every Docker project follows this three-step cycle:
- Build: You write a
Dockerfileand build it into an Image. - Ship: You push that Image to a Registry (like Docker Hub) or share it.
- Run: Your server pulls the Image and runs it as a live Container.
Your first Dockerfile
A Dockerfile is a text file of instructions; each instruction creates a layer in the resulting image. We'll write a deliberately simple version first, build it, run it, then come back and improve it. The first version isn't wrong; it's just larger and slower to rebuild than it needs to be, both of which are easier to explain once you've seen the basic version work.
Make: Create a file named Dockerfile (no extension) in your project root:
# Start from official Python image
FROM python:3.11-slim

# Set working directory inside container
WORKDIR /app

# Copy requirements file
COPY requirements.txt .

# Install Python dependencies
RUN pip install --no-cache-dir -r requirements.txt

# Copy application code
COPY . .

# Expose port 8000
EXPOSE 8000

# Command to run the application
CMD ["uvicorn", "main:app", "--host", "0.0.0.0", "--port", "8000"]
Check: Build the Docker image. From your project directory (where the Dockerfile is located), run:
docker build -t news-api .
The -t news-api flag names your image "news-api". The . tells Docker to use the current directory as the build context (where to find the Dockerfile and your code). You'll see output like this, with Docker executing each instruction:
[+] Building 23.4s (11/11) FINISHED
 => [internal] load build definition from Dockerfile
 => [internal] load .dockerignore
 => [internal] load metadata for docker.io/library/python:3.11-slim
 => [1/6] FROM docker.io/library/python:3.11-slim
 => [internal] load build context
 => [2/6] WORKDIR /app
 => [3/6] COPY requirements.txt .
 => [4/6] RUN pip install --no-cache-dir -r requirements.txt
 => [5/6] COPY . .
 => [6/6] exporting to image
 => => naming to docker.io/library/news-api
Successfully built news-api
Now run a container from your image:
docker run -p 8000:8000 --env-file .env news-api
The -p 8000:8000 flag maps port 8000 inside the container to port 8000 on your host machine. The --env-file .env loads environment variables from your .env file. Your API starts inside the container, and you can access it at http://localhost:8000 just like before.
FROM python:3.11-slim: Every image starts from a base image. python:3.11-slim is an official Python image with Python 3.11 installed on a minimal Debian Linux system. "Slim" variants exclude unnecessary packages, reducing image size.
WORKDIR /app: Sets the working directory inside the container. All subsequent commands run from /app. This is like cd /app but persistent for the entire image.
COPY requirements.txt .: Copies requirements.txt from your host machine to the container's current directory (/app). The . means "current directory in the container."
RUN pip install: Executes a command during image build. This installs Python packages and saves them in the image. --no-cache-dir prevents pip from caching downloaded packages, reducing image size.
COPY . .: Copies all files from your project directory to /app in the container. Your application code is now in the image.
EXPOSE 8000: Documents that this container listens on port 8000. This doesn't actually open the port (that happens with -p when running), but it's documentation for users of your image.
CMD: Specifies the command to run when the container starts. This starts your FastAPI application with uvicorn. --host 0.0.0.0 makes the API accessible from outside the container.
Optimising with multi-stage builds
The basic Dockerfile works but produces a large image. Your image likely measures 400-500 MB because it includes build tools, source files, and cached data that aren't needed to run the application. Multi-stage builds solve this by using multiple FROM statements to build in one stage and copy only necessary artefacts to a minimal final stage.
Make: Replace your basic Dockerfile with this optimised version:
# ============================================
# Stage 1: Builder - Install dependencies
# ============================================
FROM python:3.11-slim as builder

WORKDIR /app

# Install system dependencies needed for Python packages
RUN apt-get update && apt-get install -y \
    gcc \
    postgresql-client \
    && rm -rf /var/lib/apt/lists/*

# Copy and install Python dependencies into a neutral prefix
COPY requirements.txt .
RUN pip install --no-cache-dir --prefix=/install -r requirements.txt

# ============================================
# Stage 2: Runtime - Minimal final image
# ============================================
FROM python:3.11-slim

WORKDIR /app

# Install only runtime dependencies (no build tools)
RUN apt-get update && apt-get install -y \
    libpq5 \
    && rm -rf /var/lib/apt/lists/*

# Copy Python packages from builder stage
COPY --from=builder /install /usr/local

# Copy application code
COPY . .

# Create non-root user for security
RUN useradd -m -u 1000 apiuser && \
    chown -R apiuser:apiuser /app
USER apiuser

# Expose port
EXPOSE 8000

# Health check
HEALTHCHECK --interval=30s --timeout=3s --start-period=5s --retries=3 \
    CMD python -c "import urllib.request; urllib.request.urlopen('http://localhost:8000/health', timeout=2)"

# Start application
CMD ["uvicorn", "main:app", "--host", "0.0.0.0", "--port", "8000"]
Check: Rebuild your image with this optimised Dockerfile:
docker build -t news-api:optimized .Compare image sizes:
docker images | grep news-apinews-api optimized abc123def456 2 minutes ago 187MB
news-api latest xyz789ghi012 15 minutes ago 452MBExtract: the multi-stage build is much smaller in this worked example. Exact numbers vary with the base image and dependency set; the load-bearing fact is that the build-time toolchain isn't in the runtime image. The non-root user and the health check are the two other production-shaped wins on the same Dockerfile.
The first FROM statement (named "builder") creates a temporary image with build tools. This stage installs gcc (C compiler needed for some Python packages like psycopg2), compiles dependencies, and creates the full Python environment. Build tools take up significant space but are only needed during installation.
The second FROM statement starts fresh from a clean Python base image. COPY --from=builder copies only the installed Python packages from the builder stage into /usr/local, leaving behind gcc, build caches, and other build-time artefacts. The final image contains only runtime dependencies, and the non-root apiuser can still import them.
The same split shows up elsewhere in software: build-time dependencies (compilers, test runners, linters) belong in the dev environment but not the shipped artefact. Multi-stage is how Dockerfiles encode that distinction.
Understanding Docker layer caching
Every instruction in a Dockerfile creates a layer. Docker caches these layers to speed up subsequent builds. Understanding layer caching is crucial for fast development workflows. Poor Dockerfile structure means rebuilding everything on every code change. Good structure means rebuilding only what changed.
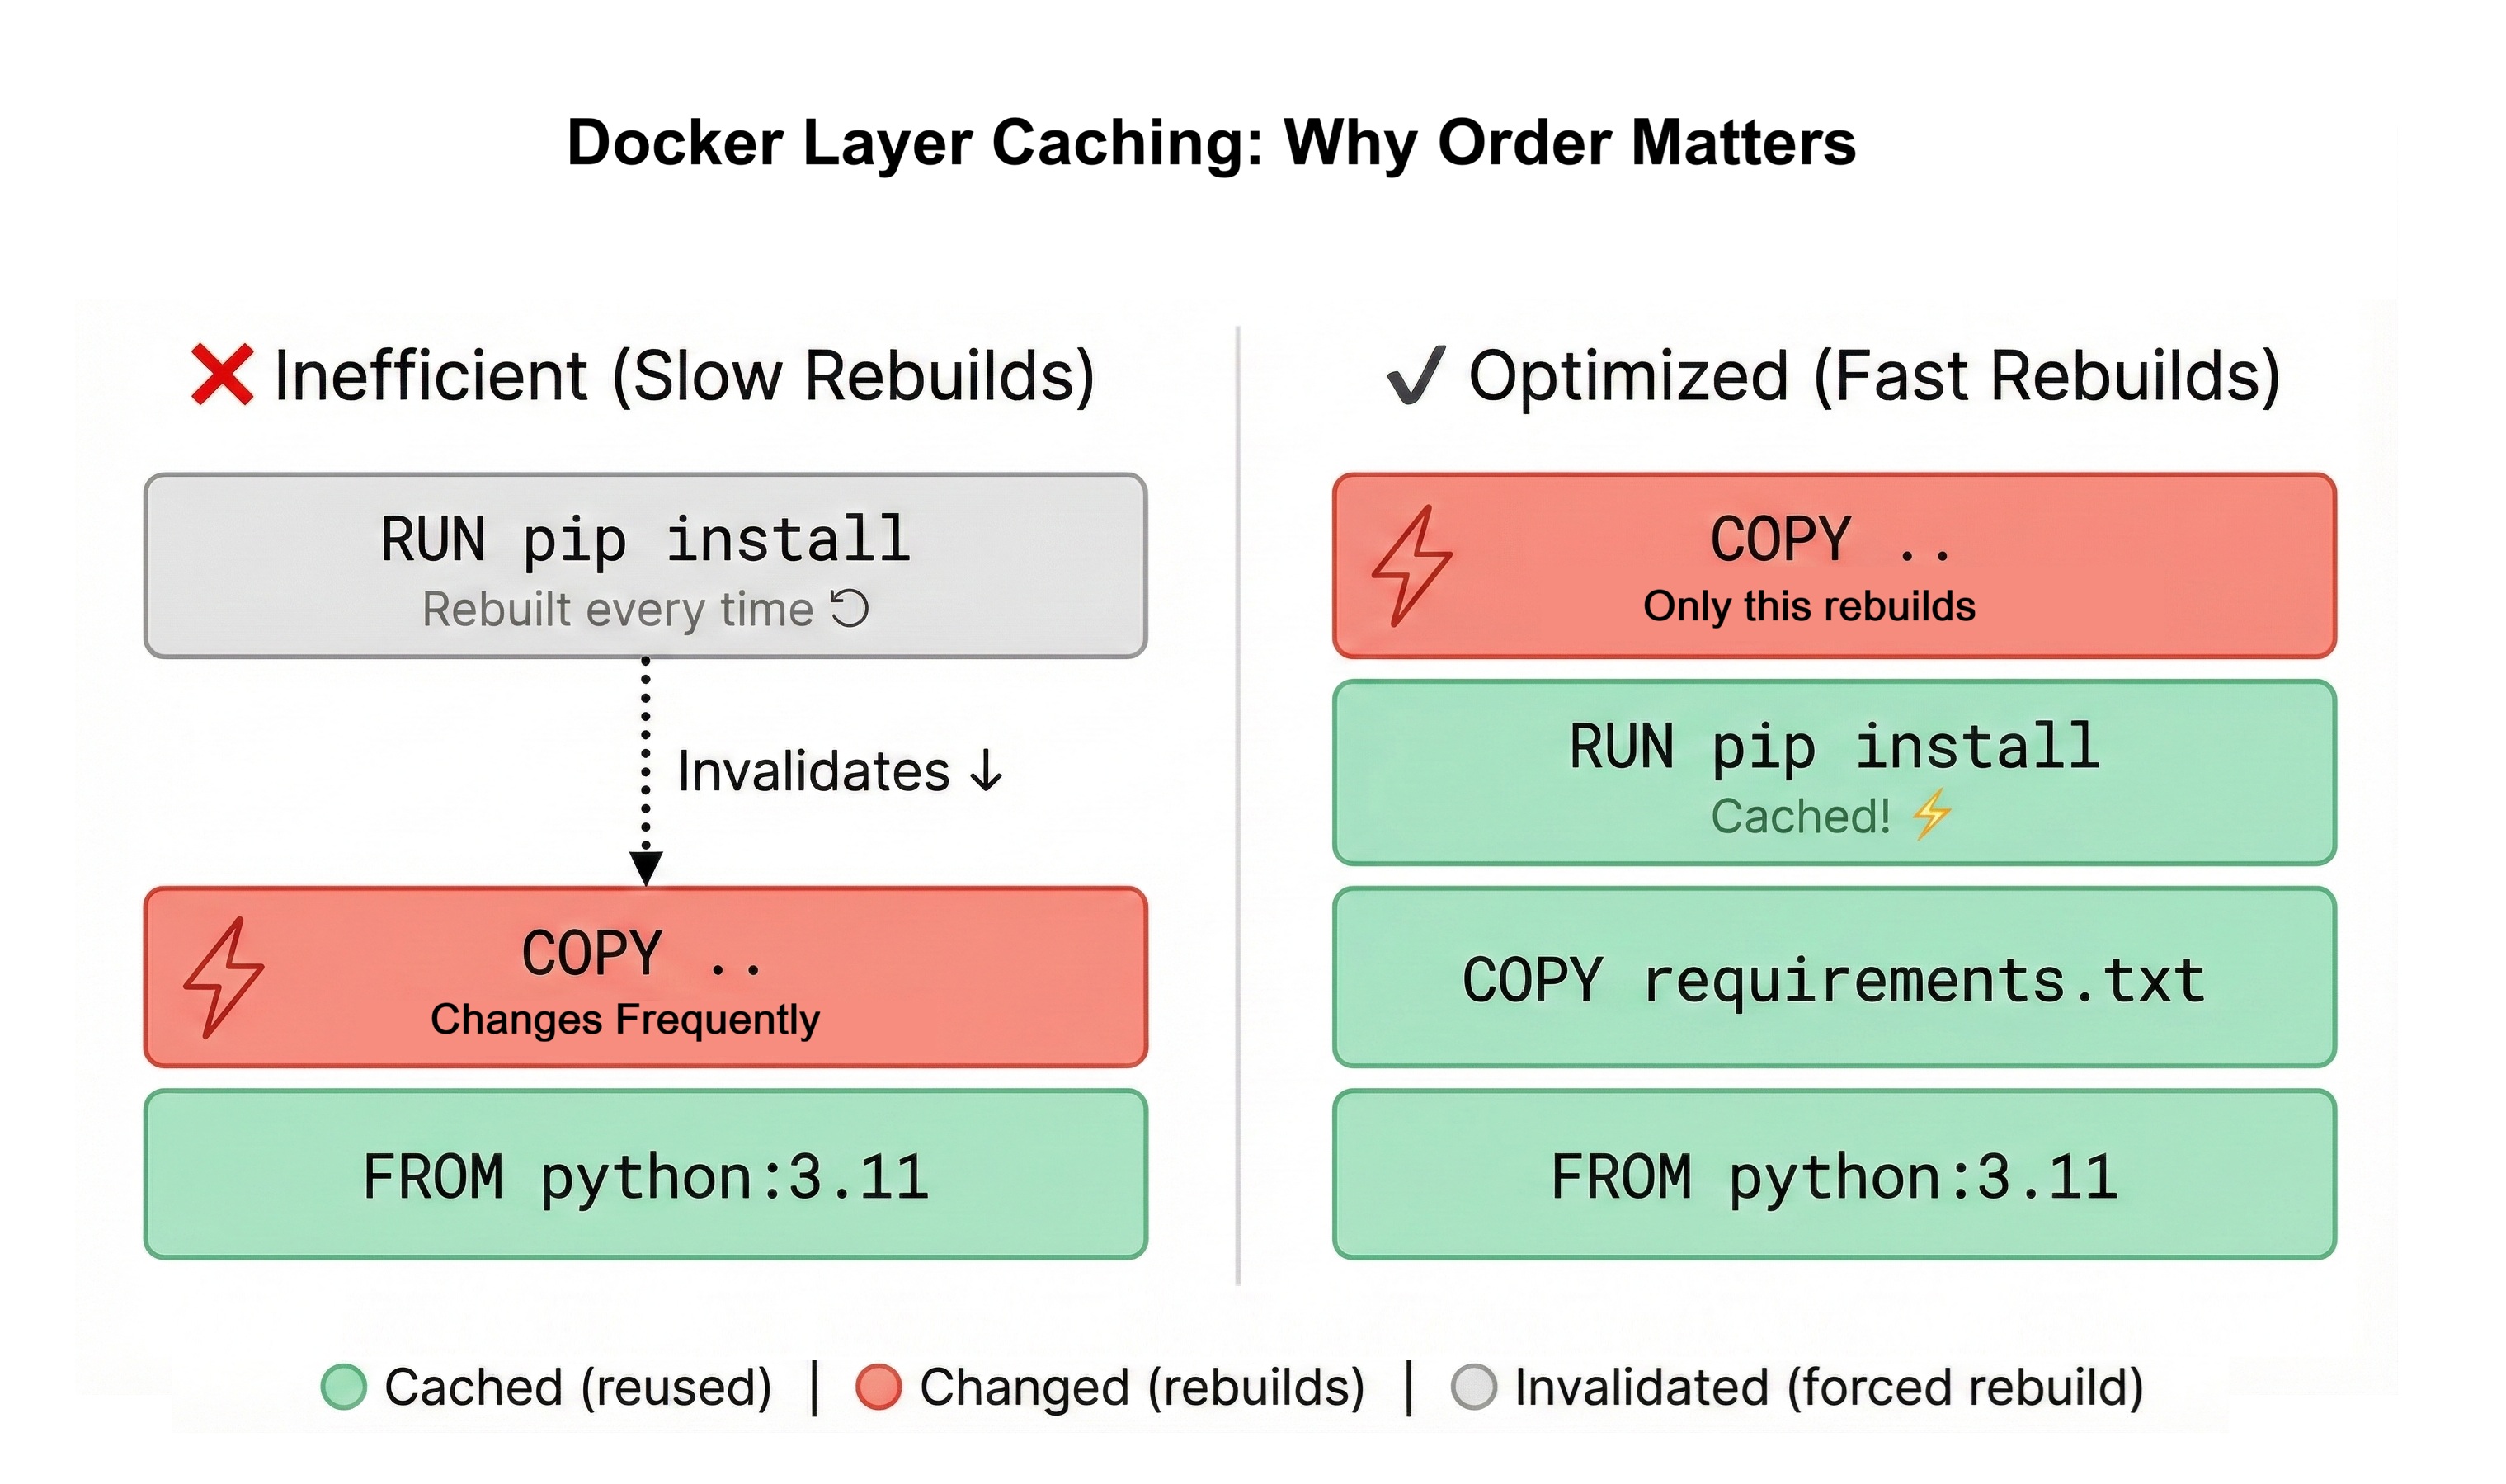
How layer caching works: Docker processes your Dockerfile from top to bottom. For each instruction, it checks if it has a cached layer from a previous build with identical inputs. If the instruction and its inputs haven't changed, Docker reuses the cached layer. If anything changed, Docker executes the instruction and invalidates all subsequent cached layers.
Example of poor layer ordering:
FROM python:3.11-slim
COPY . .                          # Copies ALL files
RUN pip install -r requirements.txt  # Installs dependencies
This structure copies all application code before installing dependencies. Every time you change any Python file (which happens constantly during development), Docker invalidates the layer and reinstalls all dependencies. On a real project that can mean waiting through the same dependency install again and again for no reason.
Example of good layer ordering:
FROM python:3.11-slim
COPY requirements.txt .           # Copy ONLY requirements
RUN pip install -r requirements.txt  # Install dependencies (cached)
COPY . .                          # Copy application code
This structure copies requirements.txt first, installs dependencies, then copies application code. When you change your Python code, Docker invalidates only the final COPY . . layer. The dependency installation layer remains cached, so ordinary code-only rebuilds finish much faster because dependencies don't reinstall unless requirements.txt changes.
Order instructions from least frequently changed to most frequently changed. Base image (FROM) changes rarely. Dependencies (requirements.txt) change occasionally. Application code changes constantly. This ordering maximizes cache reuse.
Each instruction creates a new layer. Combining commands with && keeps them in one layer. Example: RUN apt-get update && apt-get install -y package creates one layer. Separate RUN statements create multiple layers and prevent atomic package manager operations.
Layer invalidation cascades. When layer N changes, all layers after N are invalidated and rebuilt. This is why ordering matters. Put stable instructions early, volatile instructions late.
Cache is local to your machine. Pushing an image to a registry doesn't push cached layers. Teammates building from scratch don't benefit from your cache. Multi-stage builds mitigate this by reducing what needs to be rebuilt.
Optimising build context with .dockerignore
When you run docker build, Docker sends your entire project directory (the build context) to the Docker daemon. If your project includes large files like node_modules/, .git/, test data, or local databases, Docker unnecessarily copies gigabytes of data before building. This slows builds dramatically.
A .dockerignore file works like .gitignore, telling Docker which files to exclude from the build context. Create one in your project root:
# Git repository data
.git
.gitignore

# Python cache and virtual environments
__pycache__
*.pyc
*.pyo
*.pyd
.Python
venv/
env/
.venv

# Development databases
*.db
*.sqlite3
news_aggregator.db

# IDE and editor files
.vscode/
.idea/
*.swp
*.swo
*~

# Documentation
*.md
docs/

# Test files
tests/
test_*.py
*_test.py

# Environment files (security risk if copied)
.env
.env.local
.env.*.local

# Docker files (don't need to copy these into container)
Dockerfile
.dockerignore
docker-compose.yml

# Logs and temporary files
*.log
logs/
tmp/
The exclusion list cuts the build context down to just the files the image needs. The bigger win, though, is that .env never makes it into the build context, so credentials don't accidentally get baked into an image that later gets pushed to a registry.
Next, in section 5, the Dockerfile we just wrote becomes one service in a Compose stack, alongside Postgres and Redis, so the whole API runs with one command instead of three terminal windows.
Checkpoint: Docker fundamentals
Use this quiz to check your understanding. Try to answer each question out loud or in a notebook before expanding the explanation. If you get stuck, that's a signal to revisit the relevant section.
What's the difference between a Docker image and a container?
Answer: An image is a blueprint, a read-only template containing your application and dependencies. A container is a running instance of an image, the actual executing application with its own processes and state.
The analogy: Image is like a Python class definition. Container is like an object instantiated from that class. You can run multiple containers (objects) from one image (class), each with independent state.
Workflow: Write Dockerfile -> Build image -> Run container from image. Changing code requires rebuilding the image, then running a new container from the updated image.
Why use multi-stage builds instead of a single FROM statement?
Answer: Multi-stage builds reduce image size by separating build-time dependencies from runtime dependencies. The first stage includes build tools (gcc, compilers) needed to install packages. The second stage starts fresh and copies only the compiled packages, leaving behind build tools.
Result: A basic Dockerfile might produce 450 MB images. Multi-stage builds produce 180 MB images with identical functionality. Smaller images mean faster deployments, lower bandwidth costs, and quicker container starts.
The split mirrors the dev-vs-prod dependency separation you'd already make in requirements-dev.txt vs requirements.txt; the Dockerfile is just encoding the same boundary at the image layer.